Refrigerator Chocolate Cake aka Queen Elizabeth Cake

Our family spent Easter Break 2018 driving around Ireland. We flew into Dublin to cold and rainy weather, which we were expecting. But the snow… that was a fun surprise. We did need to call on our inner hearty souls for the adventure. But that was part of the charm! As the kiddies are well-aware though not terribly pleased by, when we travel out of our time zone, it’s my practice (which everyone gets to participate in) to hit the ground running in order to acclimate to the new time and clime. For our arrival in Dublin, this refrigerator chocolate cake – which we’ve (I’ve, really) dubbed The Queen Elizabeth Cake – saved us. Probably literally.
We arrived in Dublin early in the morning and were able to drop our bags off at our hotel before heading out for breakfast and a hop-on-hop-off bus tour. It’s one of my favorite Very Touristy Things To Do in any city that has it. First, it lets a person get the lay of the land with historical and interesting tidbits of information from the guide, with the freedom to hop off to take a lookiloo and then back on at will. Second, it allows a person who’s not totally on board with the whole “hit the ground running” thing to skip a few stop and get a catnap in. Just remember to have someone who does stay awake to keep track of where you are.
After a few passed stops, we arrived at the National Museum of Ireland a little damp and not just a little hangry. Before tromping through to see the bog people bodies, we stopped in at the tea shop for a snack. There is something absolutely civilized and comforting about being served a meal on actual plates with real cutlery. Not to be outshone by its ambiance, the snack shop had delicious sandwiches and hot drinks.
Eyeballing the sweets case, and rightly not sure where he next snack was coming from, our sugar baby, Locust the Younger, said he thought he’d like a piece of that, pointing at what looked like a loaf of chocolate with cookies in it (that is, exactly what it is bee-tee-dubs). The lovely clerk said it was called refrigerator chocolate cake and, able to size up her audience, gave each of the boys a right hearty slab.
From that point on, every cafe, museum, roadside snack shop and fancy restaurant had their menu perused for this chocolate cake. And until we discovered sticky toffee pudding at Bushmill’s Inn, it was the go-to pick-me-up, dessert, breakfast, and snack of choice. Even after, one wasn’t discarded; just great negotiations took place arguing that both should be enjoyed. Simultaneously.
When we got back home to the U.S., I looked for a recipe. Note to self: always ask for the recipe when you are in the place with the food you’d like to replicate. It will save you time and get you (hopefully) a reliable recipe. I did not. So, my research got me all sorts of “recipes”. Some contained egg. Others had fruits and/or nuts mixed in. And still others – egad – used graham crackers. None were exactly right for my taste bud remembrance.
Then I stumbled onto Salon’s recipe for a “four-ingredient chocolate fridge cake“. Could it be? Yes it was. With just chocolate, digestive biscuits, syrup and butter, this cake will wow friends and family. It’s no-bake. And most importantly, for folks who just aren’t into baking, it is no-fail. You just melt the butter, add the chocolate and syrup, break in the biscuits, stir it all together and press into a loaf pan. Done!
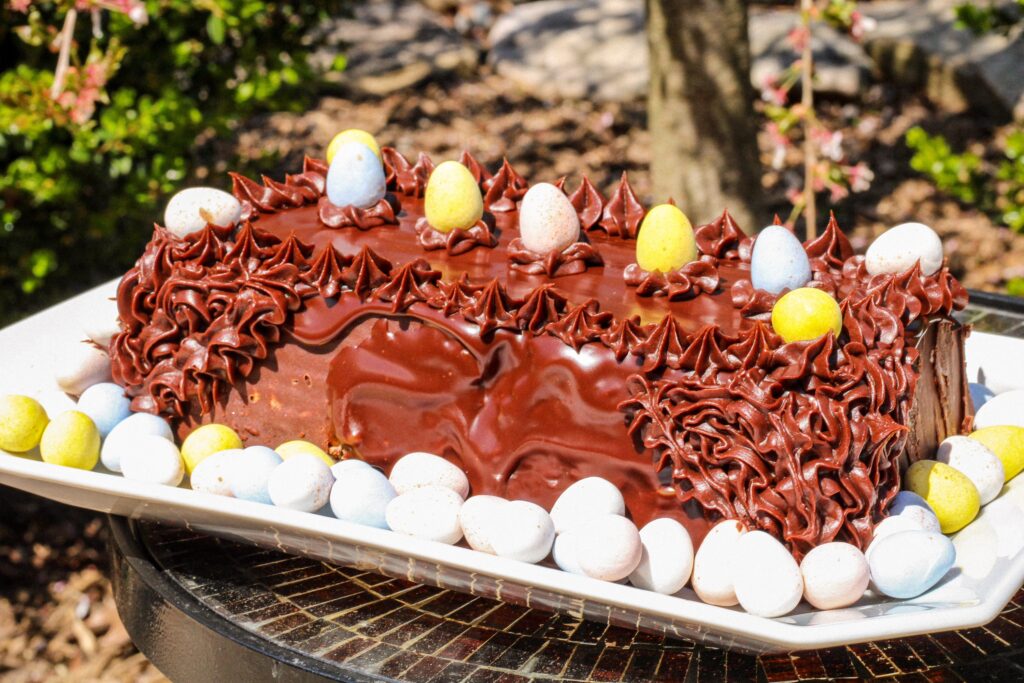
I’ve adjusted the recipe to use an entire roll of digestive biscuits so mine is a wee bit more biscuit-y than chocolate-y. But my cohabitating aficionados say it’s spot on. The refrigerator chocolate cake appears -and will continue to appear – every Easter since our trip to Ireland because it’s a delicious reminder of a wonderful trip. Note the Cadbury mini egg nod to the season. Plus they are my favorite Easter candy so if the extra fall off the back of the truck into my maw, so be it.
CONSTRUCTION
ACT 1: THE PAN
I use an 8×4″ loaf pan because that’s what I’ve got. A 9″ loaf pan will work just as well though will be longer and thinner. I would imagine an 8′ or 9″ square pan would work also though I’m not sure cutting it would be a walk in the park.
Whichever pan you choose, it needs to be lined for easy removal of the cake. You can use plastic wrap, making sure to drape it in so that you can tuck into the corners for a sharp loaf. Or you can use non-stick spray with a parchment sling. Or, being the belt-and-suspenders type that I am, follow my lead and put a parchment sling in, lined with plastic wrap. I’ve had the plastic wrap rip when trying to stick the dismount so this is the trustiest method and the one that I like best.
COOKIE PREP
McVitie’s Digestive Biscuits are available in the International Section of all our local grocery stores. I can’t think of a substitute that has both the flavor and heft that I think this cake needs. You can also, if planning ahead, buy from BnL or other online purveyors. I’ve read that you can use untopped graham crackers but I just don’t see it. I think they’d get mushy. But that’s me. If you try it, Mikey, let me know.
To prep the cookies, I break them by hand into pieces that are no bigger than a bite the average bear would take but no smaller than a kidney bean. You can certainly use the Ziploc bag/mallet option but that gives me cookie dust. It’s possible that I use it too much as a therapy session, beating out my frustrations. While I feel better afterward, most of the cookies are unusable dust. Chose your adventure with that in mind.
THE CHOCOLATE MIDDLE
Divide the chocolate chips into 12 oz. for the cake and the other 4 for the ganache before you go any further. It will save you the forehead slapping that could occur if you just dump without thinking. I have done this; no shame and not a bad result … just no chocolate for decorating. OMINOUS VOICE: “You have been warned!”
In a saucepan that needs to be large enough to hold all of the ingredients eventually (including the cookies), melt the butter over medium heat. Either remove from the heat at this point or if you’d like to add the toasty flavor of browned butter, have at it. Just make sure to watch it carefully as the solids brown and remove from the heat as soon as you get the color you like. I do not generally brown the butter. If you do, let me know what you think. Please and thank you.
Off the heat, add the 12 oz. of chocolate chips and syrup. Let it sit for 2-3 minutes and then stir until all the chocolate is melted and is glossy.
A note about the syrup: Lyle’s Golden Syrup is choice number one. Karo syrup, however, gets the job done if you can’t get Lyle’s. Think of the difference between real maple syrup and the sorts in lady- or log cabin-shaped bottles. It’s definitely serviceable. And nobody will be the wiser. But there is a subtle delicious difference Lyle’s provides. Also, people in my house like Lyle’s as a pancake and waffle syrup so it definitely won’t go to waste.
Add the cookie bits and stir bottom-to-top until all of the cookies are coated. Be quick but gentle.
Pour half of the chocolate cookie mixture into the prepared pan and press firmly so that all of the corners of the pan are filled. Put the remaining mixture in and press down firmly. I put a piece of parchment down and use a second loaf pan to do the pressing. I keep the parchment there and then cover the entire loaf pan in plastic wrap. Refrigerator smells are sneaky. Make sure to fully cover the cake.
Refrigerate for a few hours or overnight until the cake is solid.
PREPARE FOR YOUR CURTAIN CALL
About an hour before you are ready to serve (or earlier … just put back into the refrigerator until an hour before serving), unmold the cake onto a serving platter. Don’t worry if it’s not beautiful; that’s what the ganache is for.
Put the remaining 4 oz. of chocolate chips into a heatproof bowl.
In a small saucepan, heat the whipping or heavy cream over medium heat until bubbles just start to form at the edges. Pour the cream over the chocolate and let sit 5 minutes.
Stir the ganache until smooth and shiny. If you want to pour some or all of the ganache over the cake to make a smooth frosted look, use when the ganache is at room-temperature but still pourable.
For piping, continue to stir the ganache (or the part remaining after you’ve poured some) every 5-10 minutes until the ganache is thick enough to pipe (it will hold it’s shape on a spoon). Put into a piping bag and decorate to your heart’s desire.`
Top with Cadbury eggs. Or not. Follow whatever speaks to your decorating heart.
And finally…
If you’ve gotten this far (bless you) and you’re wondering about the Queen Elizabeth part of the name, during my recipe research I found that the queen of England is partial to this cake. As I am also an Elizabeth, Queen of all I survey within the four walls of my home, I thought the name most fitting. And it gets me eye rolls. Every. Single. Time. Hashtag life goals.

Chocolate Refrigerator Cake aka Queen’s Cake
Ingredients
- 1 14 oz pkg McVitie's Digestive Biscuits
- 4 oz butter 1 stick
- 16 oz 60% cacao (bittersweet) Ghirardelli chocolate chips Divided 12 oz for cake / 4 oz. for ganache
- 6 oz Lyle's Golden Syrup or Karo Light Corn Syrup
- 4 oz Heavy or Whipping Cream
- 1 bag Cadbury mini eggs OPTIONAL
Instructions
CAKE
- Line a loaf pan (either 8 or 9 inch will work; one will be taller, the other longer). You can either line with heavy duty plastic wrap or spray non-stick with a parchment sling. Set the pan aside
- Break the cookies into pieces of different sizes; no bigger than a bite; no smaller than a bean. You don't want cookie dust. I do this by hand. If you can use the Ziploc bag/mallet method without making dust, have at it. I think I use it too much as a therapy session and get very little useable cookie action… though do feel better. Set the cookie bits aside.
- Put a large saucepan (that will eventually hold all of the ingredients, including cookies, over medium heat and melt the butter. Either remove from the heat or let it brown a bit if you'd like browned butter. It'll give a toasty flavor which is delicious. I did not brown the butter this go.
- When melted (or browned to you liking, remove from the heat.
- Add 12 ounces of the bittersweet chocolate chips and all of the Lyle's or Karo syrup. Let sit a few minutes to melt and then stir until smooth and shiny.
- Add the cookie bits and stir bottom-to-top until all of the cookies are coated. Be quick but gentle.
- Pour half of the chocolate cookie mixture into the prepared pan and press firmly so that all of the corners of the pan are filled. Put the remaining mixture in and press down firmly. I put a piece of parchment down and use a second loaf pan to do the pressing. I keep the parchment there and then cover the entire loaf pan in plastic wrap.
- Refrigerate for a few hours or overnight until the cake is solid.
GANACHE
- Put the remaining 4 oz. of chocolate chips into a heatproof bowl.
- In a small saucepan, heat the whipping or heavy cream over medium heat until bubbles just start to form at the edges.
- Pour the cream over the chocolate and let sit 5 minutes.
- Stir the ganache until smooth and shiny. If you want to pour the ganache over to make a mock-mirror coating, use when the ganache is at room-temperature but still pourable. For piping, continue to stir the ganache (or the part remaining after you've poured some) every 5-10 minutes until the ganache is pipeable. Put into a piping bag and decorate to your heart's desire.`
- Top with Cadbury eggs. Or not. Or whatever speaks to your decorating heart.
1 thought on “Refrigerator Chocolate Cake aka Queen Elizabeth Cake”